Showing posts with label adriano. Show all posts

Ball of light REVISITED!

you might recall my entry from last week "ball of light"

click here to read

well, given that the weather wasn't cooperating (as after few attempts it started raining), I decided to organize another session...

as I was (as usual) researching on the web, I came across with a similar technique "the dome of light"... still related to painting with light YET, instead of swinging around the cable, you need to secure it to a stick/pole and you can use it to pivot it from a fixed point (which will be the "core" of the dome.

what do you know? I accidentally picked a very peculiar date and time: Full Moon for May, 2011: May 17, 11:09...

location this time was a Buddhist temple nearby Nang Thong beach (coming back to the crime scene!)
anyway, easier to show than to describe it... here's the result of my first attempt

01_painting_with_light_dome_of_light
shutter speed at 87" f stop at 9 - (time: 11:02pm)

Surely you can notice (as I did right away) that despite having a well defined dome edge, some meridians are quite wiggly... so I decided to use this kind of imperfection with a "smokey/swirly" filling effect:

02_painting_with_light_dome_of_light
shutter at 84" f stop at 9 - (time: 11:09pm, blue filter added in post editing), cool but a bit messy dome...

as I've said, weather was slightly better but the mosquitos were hungry! Staying still trying to draw the dome was a challenge with those buggers swarming around me...
change of strategy: back to the ball of light which will keep me moving, swinging the light will prevent mosquito to get closer and I might get neater light shapes.

03_painting_with_light_ball_of_light
shutter speed at 71" f stop at 7.1 (taken at 11:26pm) - pretty cool uh? full moon with the cloudy hazy sky gave the huge flare effect

the ball of light is (personally) much more rewarding! change of composition, change location of the ball and this is what I came up with:
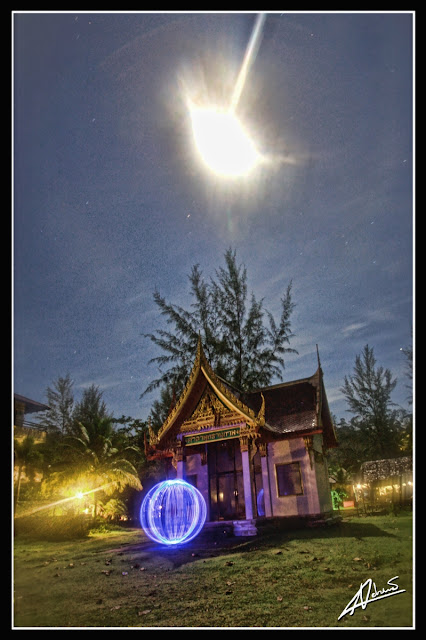
04_painting_with_light_ball_of_light
shutter speed at 84" f stop at 7.1 - full moon super flare!

last change of composition: ball of light by the shrine opposite the temple:

05_painting_with_light_ball_of_light
shutter speed at 66" f stop at 6.3 - time 11:37pm...

my "light tool" started failing for the excessive spinning and the light was coming on and off at each swing... that was the signal that for that night I was done!

I will improve and modify my tool for future "painting with light" projects, for SURE!!!

Until then... take care and keep exploring the endless possibility of photography!
Read more

Ball of light!

few weeks ago, as I was browsing the web for inspiration, I came across a specific project related to "light painting" or "painting with light": the BALL of LIGHT!

Painting with light is a technique in photography that I've already explored briefly last year but I wasn't able to find the right "thing" to do...

the Ball of Light is a fairly simple idea that gives great results so I decided to give it a try...

the tool needed is a commonly found in Europe/USA battery-operated christmas-light string of led-bulbs.

Unfortunately in Thailand all x-mas lights come with a wire and a plug and cannot be converted as they require different voltage...

after searching everywhere in Khao Lak and Phuket, I've finally found a VALID alternative: color led to "pimp your car"!!! They even come in a clear plastic box with a button and batteries (TRY ME! written all over the package)... I thought I was in heaven! a dozen in a clear plastic tube, 9 on a small squared circuit board, on a circle for the head lamps, white, blue... I just needed to grab 2 squared ones and go home to McGuiver-ize them!

Snip-Snip, cut the cable from the button, switch it with an on/off switch, extended the cable from the switch to the circuit board and there you go! 24 blue led (12 each side) with nearly 2m of cable, now I can swing the light!

Next step was to find an appropriate dark location and the beach in Nang Thong is near, dark and has a lighthouse few meters off the beach (nice!)

Tripod? check!
Camera? check!
Wide angle lens? check!
Remote control for long exposure? check!
Swinging light? check!
Sexy assistant? check!

Let's go!

The night was fine, slightly breezy, luckily without rain... YET!
Equipment set, swinger (me) ready, assistant operating remote shutter ready...

this is the first result:

ball of light - painting with light photography 01

not bad as first attempt! wisely enough I remembered to mark a cross on the sand where the light would have had to swing... with a shutter of 65" and aperture  f6.3 you can still see my silhouette inside the right side of the ball...

second picture:

ball of light - painting with light photography 02
much better! I like the light in the background, longer exposure (135" or 2 minutes 15 sec) same f stop (6.3)

Here comes another one:

ball of light - painting with light photography 03
in this one I choose to swing the light a bit further away from the camera and much closer to shore...
shutter at 140" or 2'20" and f8

Last chance I had at it before the storm was a much closer to the camera shot:

ball of light - painting with light photography 04
mmmmm... not the best composition... I had to improvise in pitch black light.... 62" f8

Anyway, overall I'm pleased with this mini improvised project! however, given the rain, I couldn't mess around with all my ideas; accordingly, I played with them in photoshop...


Can't wait to find another location for more balls of light!!!
Read more

UW Photo Workshop on M/V Oktavia 7-12 April 2011

Hello everybody!
Yes, I'm back from the underwater photo workshop organized on M/V Oktavia around Similan, Koh Bon, Koh Tachai and Richelieu Rock (7-12 April 2011).


Over the 5-day-trip several divers and even a snorkeler participated in this new project of mine.
This has been a Test Run for the next season, I'm planning to make it a regular (monthly?) thing for all the enthusiasts and passionate about under water photography.

Here's the group picture of all the participants of the trip.

Oktavia Liveaboard and Photo Workshop Participants

All of them were on the boat for the cruise while Andy and Martin (fist 2 from left, back row), Mary (first from right with black tanktop), Soren (second from right with green T-shirt), Lanna (happy mother holding her baby), and Guido (he's the one taking this picture, oops!) joined the workshop in order to improve or build from scratch their Diving and UW photography skills.

A part from Guido who was using a 6 years old Sony Cybershot, everyone was using a Canon camera, including (OBVIOUSLY) myself.

First day of the workshop is generally to asses the divers and to allow them to make as many mistakes as possible so that during the review session in the evening everybody can discuss and learn from the results. Of course a brief introduction to basic rules of UW photography is given, YET without going into specific details.

Adriano and Bernie (Tour Leader) giving briefing

One important aspect of UW photography is buoyancy (too often overlooked, YET crucial) together with knowing your camera inside and out (which was a challenge for those who rented it for this event).

Honorable Mention to Lanna with her picture of a diver using white balance

Over 5 days of briefings, slideshows, chatting, tips and tricks, assignments and evening reviews, even those who were not participating in the workshop started being "experts" in composition, light, and subjects' behavior...

Due to the stormy days that preceded the trip, visibility hasn't always been the usual good one (10-15m as opposed to 20-30m). This little draw back made me focus on macro subjects and techniques which are by far my favorites! Here's an example:

Soft Coral detail: 1/500 f 8.0 dual Sea&Sea external strobe + UN x6 MACRO wet lens 

Similan National Park offers a wide range of dive sites from gently sloping sandy reefs to majestic boulders and channels with dramatic topography. Techniques explored during the trip ranged from use of flash versus evaluating white balance, macro, wide, silhouettes and much more...

Flutemouth Fish Silhouette 

Post editing workshop were also provided in order to show that not all "bad pictures" are always bad... a bit of colour saturation enhancement, cropping or just rotating the photo by 90 degrees surprisingly made a difference and improvement.

90 degrees rotation

5 days and 19 dives later, every participant was asked to submit in a friendly contest 2 of their pictures in order to be evaluated by an independent jury (boat owner Mr. Kulan).

I must say that it hasn't been easy for the judge as the pictures taken and submitted were really good, not to mention that some of the participants improved dramatically during the length of the workshop.

Without further ado, let me present the 3 final winning pictures!

In third position, winning an M/V Oktavia polo shirt is this macro shot of Durban Dancing Shrimps from Martin who used a Canon Ixus 95 IS:

Third place: Shrimps 1/60 f2.8, macro + internal flash

In second position, Mr. Soren from Denmark who was using a Canon G10 and won 30% discount on his accommodation in one of the hotels of the Suwan Palm Group with his "Turtle with Diver"

Second Place: Turtle w/diver 1/160 f2.8 internal flash
Finally, in 1st position Mary with her rented Canon G11 who shot this nudibranch and won a 20%discount on her next liveaboard on M/V Oktavia.

First Place: Nudi 1/500 f 4.0 internal flash

Excellent Job everybody! Amazing diving, great pictures and lots of fun!

At the end of the trip, I was asked to do a slideshow of the pictures I took during this workshop.
Here a few of them...
Enjoy!

Partner Shrimp on Pin Cushion Sea Star
Oriental Sweetlips at cleaning station
Turtle and Diver - white balance
Western Clown Fish
Harlequin Shrimp Close Up
Harlequin Shrimp Couple having a snack!
Jelly against sun burst
Anemone Close Up

That's all folks! See you next time for more pictures, diving, wetpixels and what not?

Ciao!
Read more

MACRO Lens on Thai Muang (tin dredger) wreck

Finally I've picked my self birthday present: UN UNCU-02 x6 Close-up Lens for 67mm Thread on F. I. T M67 Mount Base DC28 for Canon WP-DC28 for my Canon G10.


Equipped with my 2 Sea & Sea YS27 DX external strobes, on March 16th 2011 my partner Kaye and I joined a longtail boat heading to the Thai Muang wreck (a.k.a. "Dodreco 103" or "Premchai 103") 30minutes ride off Khao Lak coast.

UnderWater Paparazzi and his tuned up camera

This wreck is an old tin dredger, one of the several (now disused and sunk) scatter around west the coast line of Thailand. There is one I know of in Bang Tao Bay (Phuket), a very famous one the "Boonsung" off the coast of Bang Sak beach (North of Khao Lak) and the "Premchai 103" off the coast of Thab Lamu (south of Khao Lak)

here's the GPS coordinates (linking to google map) and a 3D map realized by one of the DMT of the dive center hiring the longtail boat.

8.546732, 
98.196788


Thai Munag Wreck 3D Map


Local diving offers an amazing variety of marine life.
Accordingly, the choice between wide angle and macro is sometimes very hard.
Schools of Trevalleys and Yellowtail snapper obstract the view of the wreck at times.

snapper galore on Thai Muang Wreck

But before getting up close and personal with the wreck, on the sandy bottom (19-20m) NW off the dredger there is an enormous anemone with few fearless territorial Clarks Anemone Fish... and where there is this duo, there's almost always anothe subject making it a trio: Porcelain Anemone Crab.

UnderWater Paparazzi testing his new wet MACRO lens

The UN UNCU-02 x6 Close-up Lens has an impressive magnification power, yet the drawback is that it "kills" the auto focus option of my G10; accordingly, I had to manual (as is moving my hand back and forth) focus on my subject. The following picture shows how close I had to get...

UN UNCU-02 x6 Close-up Lens on Porcelain Anemone Crabs

Lots of patience and lots of hard work! But check out the results:

Porcelain Anemone Crabs BOKKEH

How about this close-up???

Porcelain Anemone Crab SUPER CLOSE UP

want more? Just follow us around it...

detail of "Premchai 103" or Thai Muang wreck 

on one of the edges I came across a Banded Boxer Shrimp, I went for full "fire power" and got him a super close mug shot!

Banded Boxer Shrimp SUPER CLOSE UP 

not enough? keep following us around the "Dodreco 103" or "Premchai 103" or the "Thai Muang Wreck! On the 45 degres sloping side of it we found a nice nudi "Chromodoris Anulata", it was facing up and therefore I had to modify my buoyancy and angle of shoot

Upside Down UnderWater Paparazzi Balancing on his pointer, things you do for a picture...!!!


 as mentioned, it was an anulata and I had to go "manual focus" on it...

UN UNCU-02 x6 Close-up Lens on Chromodoris Annulata


and here's the result:

Chromodoris Annulata with wet MACRO Lens on Canon G10 and dual Sea & Sea YS27DX Strobe set


This tin dredger is still in very good conditions after it was sunk, years of corrosion, tides and the rest did not affect it that much, you can still admire lots of etail of the structure. The CLAW is one of them

The Claw of the tin dredger, the Thai Muang Wreck

let us guide you to some more interesting details of this rusty platform...

another detail of the Thai Muang Wreck


anyway, going back from wide to macro, that's what was lying on the sand right next to it: a Chromodoris Kunei which was screaming for a close up portrait by the one and only UnderWater Paparazzi... ;-)

Chromodoris Kunei on Thai Muang Wreck


Pin Cushion Star Fish are common in South East Asia, and 9 out of 10 there is always a "guest": a tiny 3mm long Partner Shrimp, usually blending in with his dark red color matching that of the host

Partner Shrimp on Pin Cushion Star Fifh

WOW! That was a perfect site to test my MACRO lens, I can say I'm really happy of the purchase and of the local dive site too! Time for a safety stop and back on land to check the pictures and post this blog entry...

a very happy UnderWater Paparazzi with his "pimped" G10

next time?
Review of the Boonsung Wreck perhaps? most likely... ;-)

with love

Adriano
Read more

Advanced Nitrox & Deco Procedures

Who would have thought?

Your one and only Under Water Paparazzi goes TECH!


Last January I did an UW shoot for PRO-TECH divers new website (coming soon) and in exchange I asked for some training rather than being paid.

In mid February I started a course of Advanced Nitrox


Advanced Nitrox Course goes hand in hand with Decompression Procedures Course


Together, theese 2 courses are 2 of the 3 steps required (Extended Range would be the missing one) to comfortably and safely dive the Blue Hole in Dahab and its famous "Archway" at a depth of  52to102m

WIKIPEDIA Blue_Hole_(Red_Sea)

DAY 1
So here I am in the classroom studying to get closer to my "diving goal"(maybe summer 2012?)...


DAY 2 (in the pool)
Nitrox 50%, MOD (Maximum Operating Depth) 21m


DAY 3 (training beach dives)
at Ao Sane Beach (Rawai- Phuket) for a beach dive with Twins and Stage Tank


Hard work: the equipment is sooooooo heavy!


getting wet!


S.T.A.R.T. check!


check, check, check, CHECK! ready to go!!!


end of the dive, let's go back on land for debriefing and lunch...


I can already smell the Chicken Cashew Nuts!


DAY 4 (3 boat dives @ 45m, 30m and 25m)
Chris, Adriano and Enrik waiting to splash into the abyss south of Racha Noi island


on the way up at around 15m of depth, I've bumped into an old friend/colleague Simon (dive instructor) who took a picture of me...


and that's all for now, as soon as I'll have budget and time I'll go for the 3rd step of Extended Range and I'll be ready for Dahab, The Blue Hole and its Arch!!!

Peace, Love and Nitrox!!!
Read more
 

Adriano's photo & pixel addiction Design by Insight © 2009